
Introduction to the Frigg Cirque
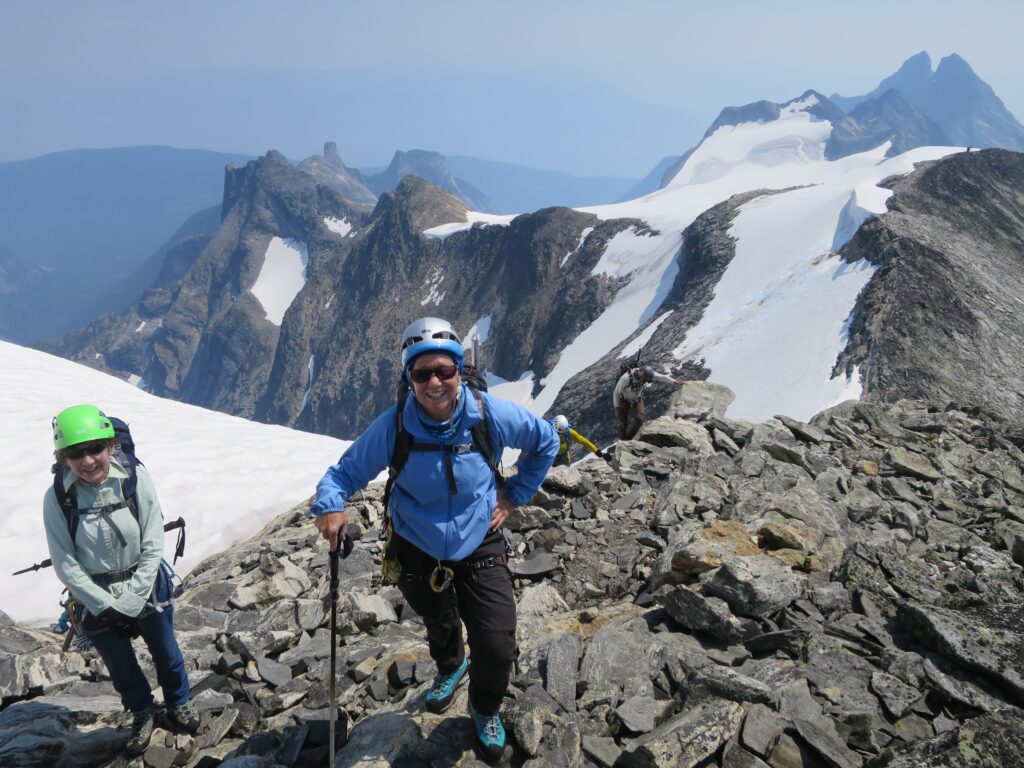
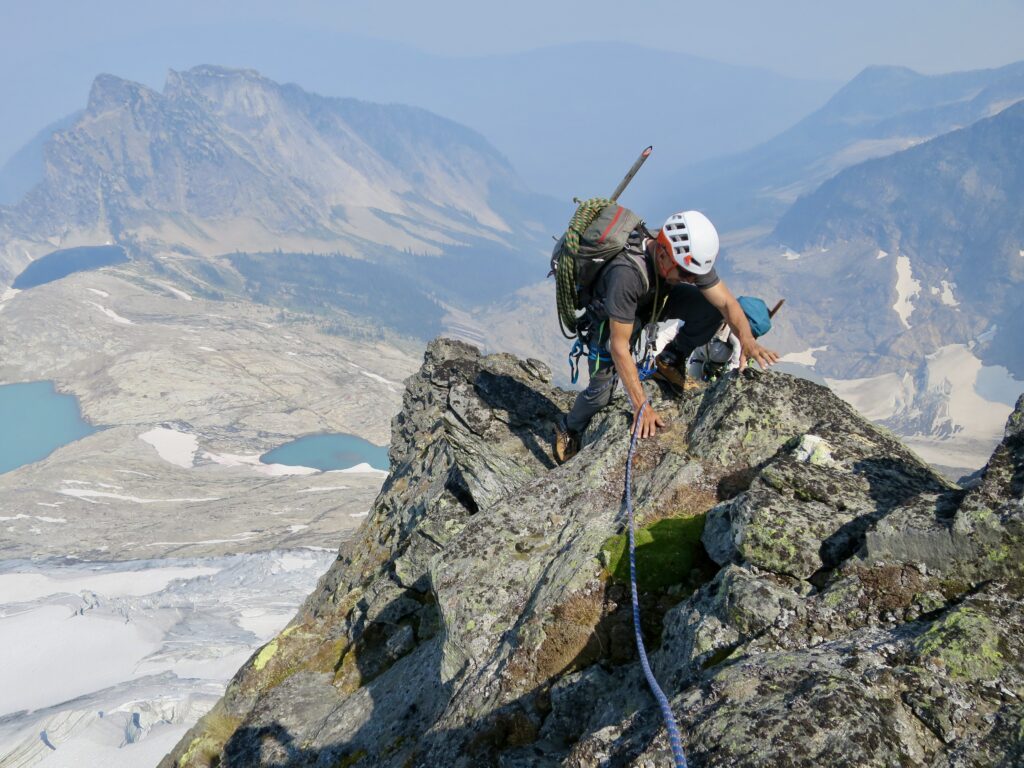
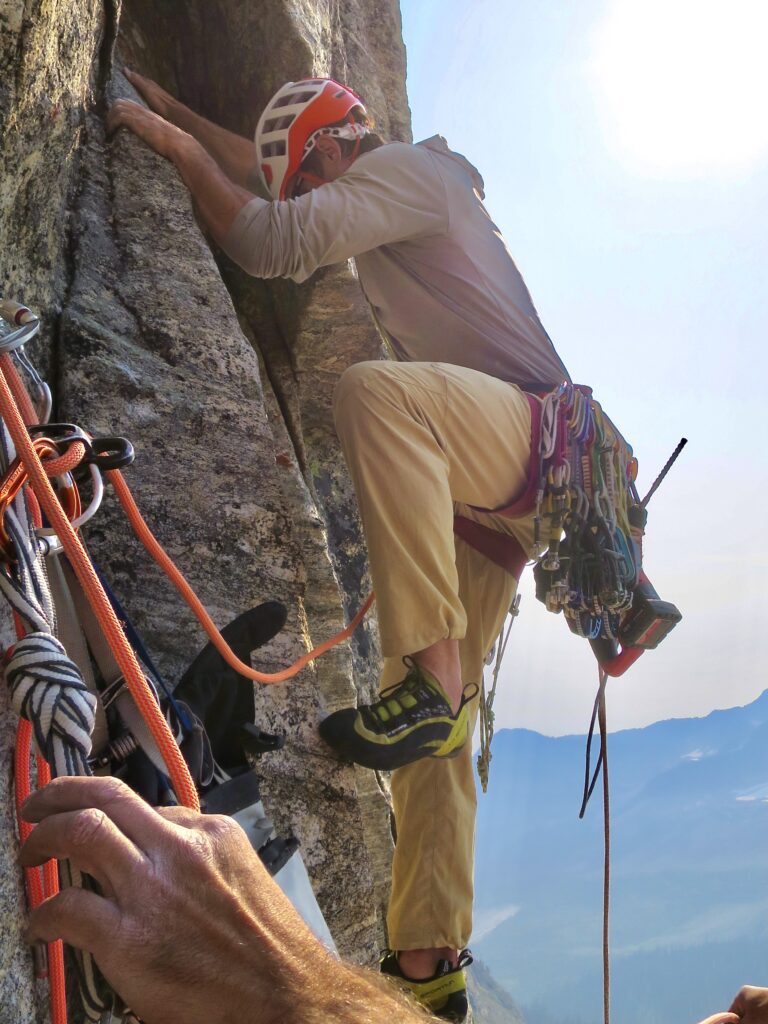
The Frigg Cirque is located approximately 50km south of Revelstoke in the Gold Range of the Monashee Mountains. The rock here is predominantly Gneiss and generally provides excellent climbing. As with most alpine climbing areas, the rock can sometimes be loose, and sometimes gritty. When you find something loose, it is more likely to be large (up to several tonnes) rather than the small loose rocks found more typically in the Rocky Mountains. The routes below are described generally for dry conditions, so an ice axe and crampons may be needed before all the seasonal snow melts. Many of the routes also involve travel on the Frigg Glacier, so climbers should be trained in glacier travel and have the appropriate rescue gear. Note that the glacier has receded a lot since the map below was made.
I have climbed all the routes described below (except I bailed off the NW Ridge of the Frigg Tower because I was too scared to pull on the flake), some several times. It's easy to misinterpret the descriptions, as I often do when reading those of others, but there shouldn't be any obvious errors. There are lots of other routes in the area I haven't attempted to describe, many of which are included in 'THE CARIBOO AND MONASHEE RANGES OF BRITISH COLUMBIA: AN ALPINIST’S GUIDE by EARLE R. WHIPPLE'. It used to be possible to download this free as a pdf, but I can't seem to find it anymore. There are also several other routes I've heard of 2nd or 3rd hand and haven't attempted to describe.
Climbing Rack
For routes with 5th class rock climbing, most people will like having a set of nuts, plus a set of cams with doubles from finger size up to 3". Many routes involve glacier travel and may require ice axe, crampons and crevasse rescue gear. There are some crevasses big enough to fall in on the upper end of the Frigg Glacier even if they can't be seen in the spring.
Access and camping
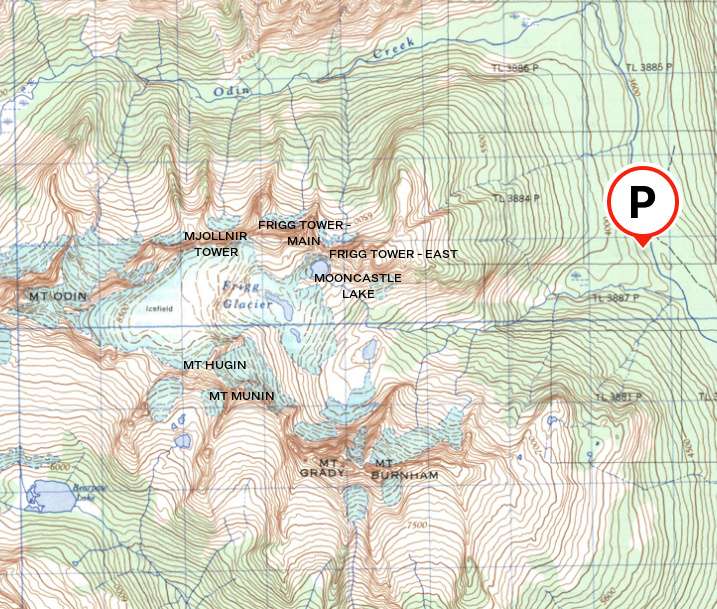
From Revelstoke, drive south on Highway 23 towards the Ferry. Turn right on the Shelter Bay FSR (this is an active logging road so please turn on your VHF radio to the correct channel) and navigate logging roads up to the deactivated spur road at 50.55704, -118.02222. Park here.
Walk up to end of the spur road and pick up a rough trail marked with flagging tape that parallels Frigg Creek. This trail was improved significantly in 2025 by a generous soul, so it is not as difficult as it used to be. At the end of the trail, find a way to cross the creek, which may involve some bushwhacking. Continue up mostly on the right side of the creek to a lake at 2100m. There is good camping and water available here, or at either of the lakes to the north or north east including Mooncastle Lake. There is no outhouse, so please bring a trowel and bury your poo at least 50m away from the lakes and creeks. Please carry out all your garbage and "leave no trace".
Map
Climbing Routes
Mt Odin
1. East Ridge
2. Angry Ptarmigan Traverse
Mjollnir Tower
3. East Ridge
Mt Hugin
4. West Ridge
5. North Face
6. North East Ridge
Mt Munin
7. East Ridge (Munin's Claw)
8. South East Ridge (Goldilocks Traverse)
8.1. Hugin - Munin Traverse
Frigg Tower - Main
9. Northwest Buttress
10. Friggsaw Puzzle
11. South Face Direct
Frigg Tower - East
12. West Ridge
13. South Face
14. Frigg's Toy
Mt Odin
1. East Ridge (Mt Odin)
F 3rd class
From camp, walk north to the grassy meadows below the Frigg Tower (~2300m), then contour west to the toe of the Frigg Glacier with the odd step of easy scrambling. Continue up the glacier and follow the East Ridge to the summit, with a few 3rd class steps. Reverse the route to descend.
2. Angry Ptarmigan Traverse (Mt Odin)
PD 4th class
From camp, walk north to the grassy meadows below the Frigg Tower (~2300m), then contour to the West col of Mjollnir Tower. The West Ridge of Mjollnir can be scrambled at 4th class by avoiding difficulties on the climbers right. The ridge can then be followed all the way to Mt Odin with a short bit of glacier travel. Descend by East Ridge/Frigg Glacier.
The route was named after a Ptarmigan that tried to attack a party while defending its chicks.
Mjollnir Tower
3. East Ridge (Mjollnir Tower)
AD 5.7
From camp, walk north to the grassy meadows below the Frigg Tower (~2300m). Climb up to the Frigg/Mjollnir col via a snow gully (up to 40 degrees) or scramble up slabs on the right. From the col, climb up the ridge crest, turning most of the difficulties on the south side. One exception is about halfway up, where some slabby face climbing leads into a long right facing corner on the north side (crux pitch). Total of 6-7 x 30-40m pitches. Continue down the West Ridge (4th class) to descend.
Mt Hugin
4. West Ridge (Mt Hugin)
F 3rd class
From camp, walk north to the grassy meadows below the Frigg Tower (~2300m), then contour west to the toe of the Frigg Glacier with the odd step of easy scrambling. Cross the Frigg Glacier and find a spot to walk onto the West Ridge, then continue to the summit. Reverse the route to descend.

5. North Face (Mt Hugin)
PD low 5th
From camp, walk north to the grassy meadows below the Frigg Tower (~2300m), then contour west to the toe of the Frigg Glacier with the odd step of easy scrambling. Head up the North Face of Mt Hugin with increasing steepness as you approach the ridge up to 40 degrees. At the top of the face, scramble up to the NE Ridge and continue to the summit, which is mostly 4th class with a couple of short steps of low 5th class. Descend down the West Ridge (3rd class) to the Frigg Glacier.
6. North East Ridge (Mt Hugin)
AD 5.6
From camp, cross the creek draining the Frigg Glacier and scramble straight up towards the base of the NE Ridge. Start at the lowest point at the toe of the buttress and climb straight up an intimidating wall with huge incut jugs on some of the best rock in the area to the base of an offwidth and chimney (40m, 5.4). Step right and climb through a short overhang into the offwidth (the flaring chimney on the left is more difficult), then continue up to a big ledge with easy scrambling above (40m, 5.4). Scramble up the ridge above (3rd to 4th class) until you are forced to rappel ~10m into a notch. From the notch, continue scrambling up the ridge until it steepens into 5th class climbing. From here, half a dozen long pitches take you through the steepening, turning most of the difficulties on the left (it can be climbed directly at 5.8). When the angle of the ridge eases off again to 4th class, continue scrambling to the summit, with one more short pitch of 5th class right below the summit. Descend down the West Ridge (3rd class) to the Frigg Glacier.
Mt Munin
7. East Ridge "Munin's Claw" (Mt Munin)
AD+ 5.8
From camp, cross the stream at the top of the waterfall or walk around the lake depending on snow levels. A short pitch of 4th class leads to easier scrambling and then onto the glacier. Walk along the claw shaped feature and scramble to the base of a chimney and an awkward belay sheltered from rockfall. Climb up the chimney, initially on good rock with good gear. The quality of rock on this pitch slowly deteriorates and becomes more runout as the angle eases (40m, 5.8). Another pitch or two of runout low 5th class climbing leads into slabby scrambling. This scrambling is interspersed with sections of grass and the occasional pitch of low 5th, eventually leading to a loose knife edged ridge. Several short easy pitches up the loose ridge take you to a col, then a steep pitch of low 5th class with big jugs leads to the summit of Mt Munin. From the summit of Mt Munin, scrambling interspersed with 3 rappels leads to the col Munin-Hugin col. From the col, either scramble up and over Mt Hugin (4th class), or take the Raven's Descent:
The east glacier (Raven's Descent) descent requires two rappels down the rock slab to bypass the bergschrund. The first rappel is 25-30m from a boulder and the second is 35m (as of 2025) onto the glacier. It's possible to walk down the glacier and exit the toe on the skiers left, then scramble (up to 4th class) back down to the lake (easiest to the skiers left). The Raven's Descent becomes more dangerous late in the season when the boulders in the ice become exposed.
8. South East Ridge "Goldilocks Traverse" (Mt Munin)
D 5.8
From camp, cross the stream at the top of the waterfall or walk around the lake depending on snow levels. Climb a short pitch of 4th class slab, then traverse left on steep moraines below the toe of the ridge. Walk up snow on the climbers left of the ridge until possible to follow an easy gully up and right onto the ridge crest at the base of 4th class slabs. Follow the ridge crest to the first flat section of the ridge (low 5th). Walk along the flats to the base of the steepening and the base of the crux pitch. On the climbers left of the ridge, climb a runout slab to the climbers left of an overhanging left facing corner, which leads into a chimney on excellent rock and eventually back to the crest of the ridge (65m, 5.8). Scrambling up to low 5th class leads to the col at the Junction with the East Ridge "Munin's Claw", with one pitch of low 5th remaining to the summit of Mt Munin. To descend, see the description for the East Ridge.

8.1. Hugin - Munin Traverse
PD+ 5.7
Take your choice of route to the summit of Mt Hugin. From here, descend to the Hugin-Munin col (4th class), then follow the ridge to the summit of Mt Munin in 3-4 pitches with a short 5.7 crux through an overlap. Descend as for Munin's Claw.

Frigg Tower - Main

9. Northwest Buttress (frigg tower - Main)
D+ 5.10
From camp, walk north to the grassy meadows below the Frigg Tower (~2300m). Climb up to the Frigg/Mjollnir col via a snow gully (up to 40 degrees) or scramble up slabs on the right. Scramble along the ridge to the base of the summit tower (4th class). From the col, climb a left facing corner on the north side to an overhang created by a detached block. Pull through the overhang and continue climbing a detached flake with care (hoping it doesn't fall off) to belay (5.10). A second easier pitch leads to the summit. Rappel Friggsaw Puzzle.
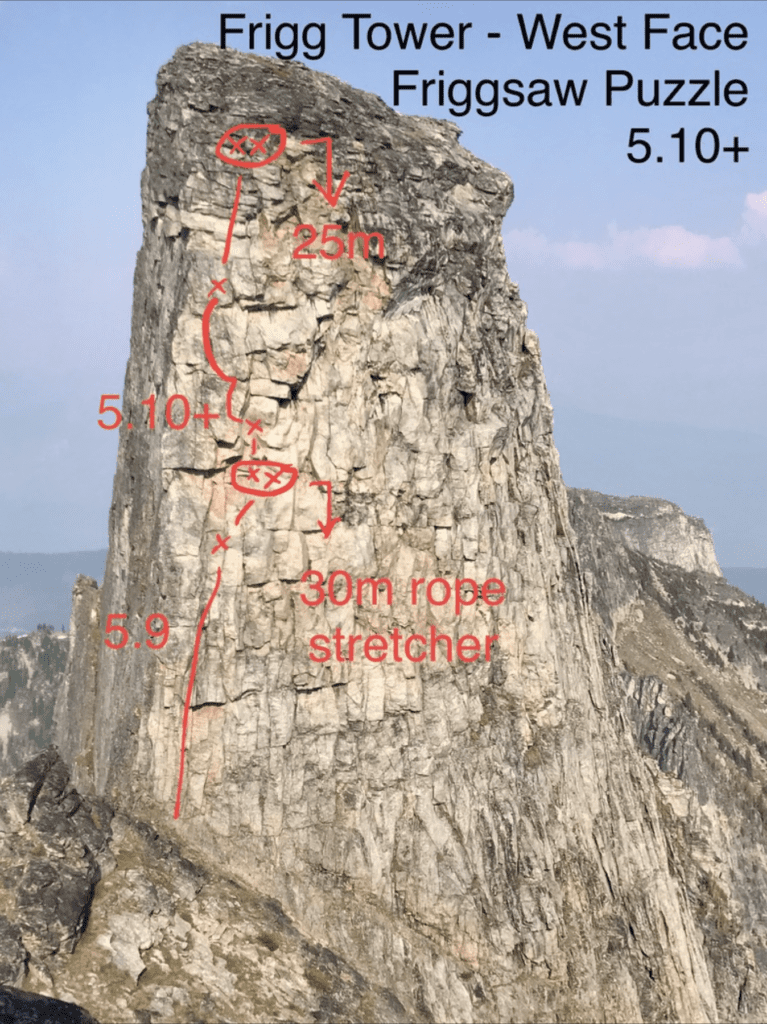
10. Friggsaw puzzle (frigg tower - Main)
D+ 5.10+, 60m
From camp, walk north to the grassy meadows below the Frigg Tower (~2300m). Climb up to the Frigg/Mjollnir col via a snow gully (up to 40 degrees) or scramble up slabs on the right. Scramble along the ridge to the base of the summit tower (4th class). From the col, climb cracks on the west face to a bolted belay (35m, 5.9). Clip a bolt, traverse left around the arete on gritty flaring cracks (crux), continue up and left on easier climbing to a bolt, then trend slightly right up to pull a final overhang and the bolted anchor (30m, 5.10+). A direct variation on the second pitch goes straight up from the anchor at 5.11. Rappel the route with one 60m rope (the second rappel is a rope stretcher).
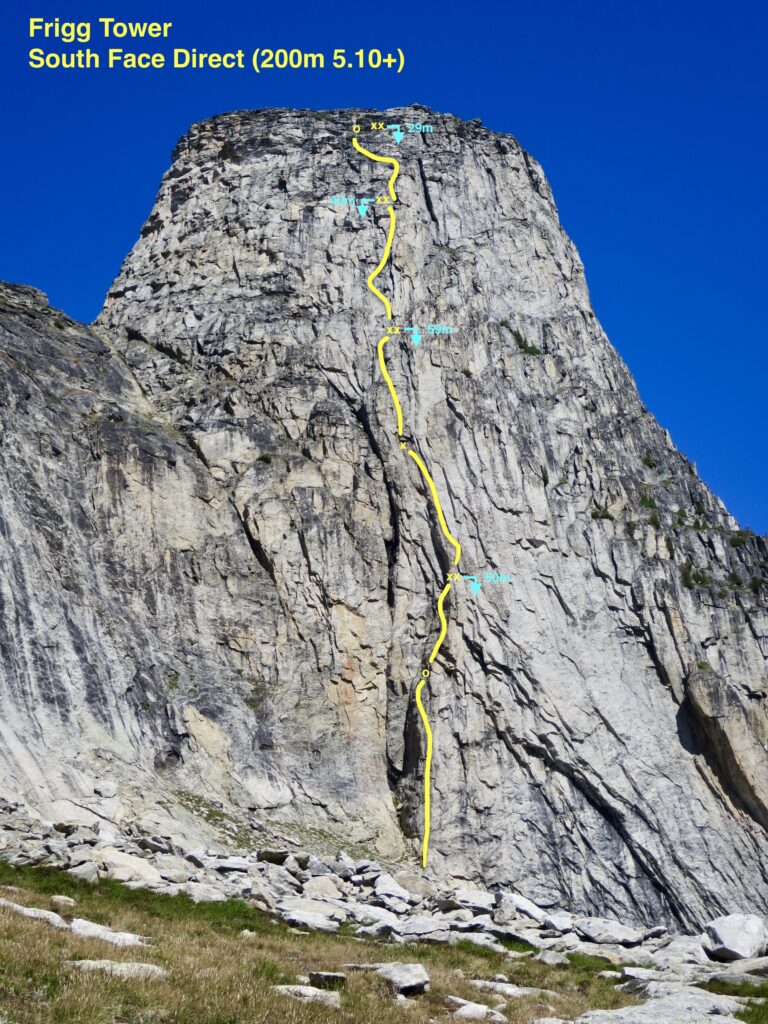
11. South Face Direct (frigg tower - Main)
TD 5.10+, 200m
Rack: Nuts, RP’s, double set of cams from micro to #3, one #4
From camp, walk north to the base of the South Face of the Frigg Tower. Note: This route often involves significant runouts and finicky gear.
P1 - Climb the arete to the right of the huge chimney in the middle of the face, passing 3 bolts to a gear anchor on a grassy ledge (40m 5.10a)
P2 - Climb the arete past a bolt, then trend left with thin gear. When the slab steepens, move right around the arete to a bolted anchor at the base of a big flake (20m 5.9)
P3 - Climb up to the flake, clip a bolt, then continue up and left into the chimney formed by a giant pinnacle. Continue past 2 more bolts to a single bolt anchor that can be backed up with gear (32m 5.10+)
P4 - Continue straight up to another bolted anchor, passing 1 bolt near the top of the pitch (32m 5.10)
P5 - Layback the big flake above the belay, then trend left before moving back right into the main corner system. Continue up corners and chimney to a bolted anchor on the left on a big ledge (45m 5.9)
P6 - Step back right and climb to the top of the chimney, then continue up easier climbing until possible to traverse left on a big ledge. Clip a bolt, then continue up and left to a gear anchor on a big grassy ledge (30m 5.9)
P7 - Short scramble to the summit (30m 4th class)
Descent
Option 1 (Recommended)- Rappel Friggsaw Puzzle (2 x 30m rappels) and scramble down via Mjollnir/Frigg col.
Option 2 - (Not recommended due to the chance of stuck ropes): Rappel the route. From the summit, scramble back down to the big grassy ledge and find the first bolted rappel anchor to the climbers right of the top of the route. Rappel 30m to the top of pitch 5. Rappel 40m to the top of pitch 4. Rappel 59m to the top of pitch 2 and hope your rope doesn’t get caught on the giant pinnacle. Rappel 60m to the ground.
Frigg Tower - East
12. West Ridge (frigg tower - east)
PD 5.5
From camp, walk north to the top of the knob, then descend down to Mooncastle Lake. Walk up steep grass slopes to the base of the West Ridge. The West Ridge can be climbed in several short pitches up to 5.5 in difficulty. To descend, walk down the East Ridge, then contour back underneath the South Face to link up with the approach.
13. South face (frigg tower - east)
D 5.9
From camp, walk north to the top of the knob, then descend down to Mooncastle Lake. Walk up steep grass slopes to the base of the South Face.
4-5 short pitches on generally clean and good rock lead more or less straight up to the summit. As for many of the routes in the area, the gear isn't always frequent or good, especially in the middle of the route where the climbing is most difficult.
To descend, walk down the East Ridge, then contour back underneath the South Face to link up with the approach.

14. Frigg's toy
F 4th class
The small spire to the east of the East Frigg Tower is a scramble up the East Ridge. It is best climbed as an add-on after climbing something on the East Frigg Tower. Otherwise it would be a long and rough walk for a very short scramble.
Approach the same as the South Face of the East Frigg Tower and continue contouring towards the east to the base of the East Ridge of Frigg's Toy. Reverse the route to descend.
Guiding in the Frigg Cirque
If you'd like to hire a guide for the area, check out my Alpine Climbing page for rates and more details.